---
front:
hard: 进阶
time: 40分钟
---
# 为小游戏地图添加引导
我们来制作一个小游戏玩法地图DEMO,并且为这个地图的大厅中添加一些引导。
点击[链接](https://g79.gdl.netease.com/Jungle_Demo.zip)可下载本章地图Demo。
## 在大厅添加NPC
先简单制作一个大厅场景,地图名为《丛林激流》,是一个轻松的“水上竞速”玩法地图;而游戏场景设定是游乐园风格,所以在大厅添加了多个游乐园会出现的小摊,引导NPC将放置于此。
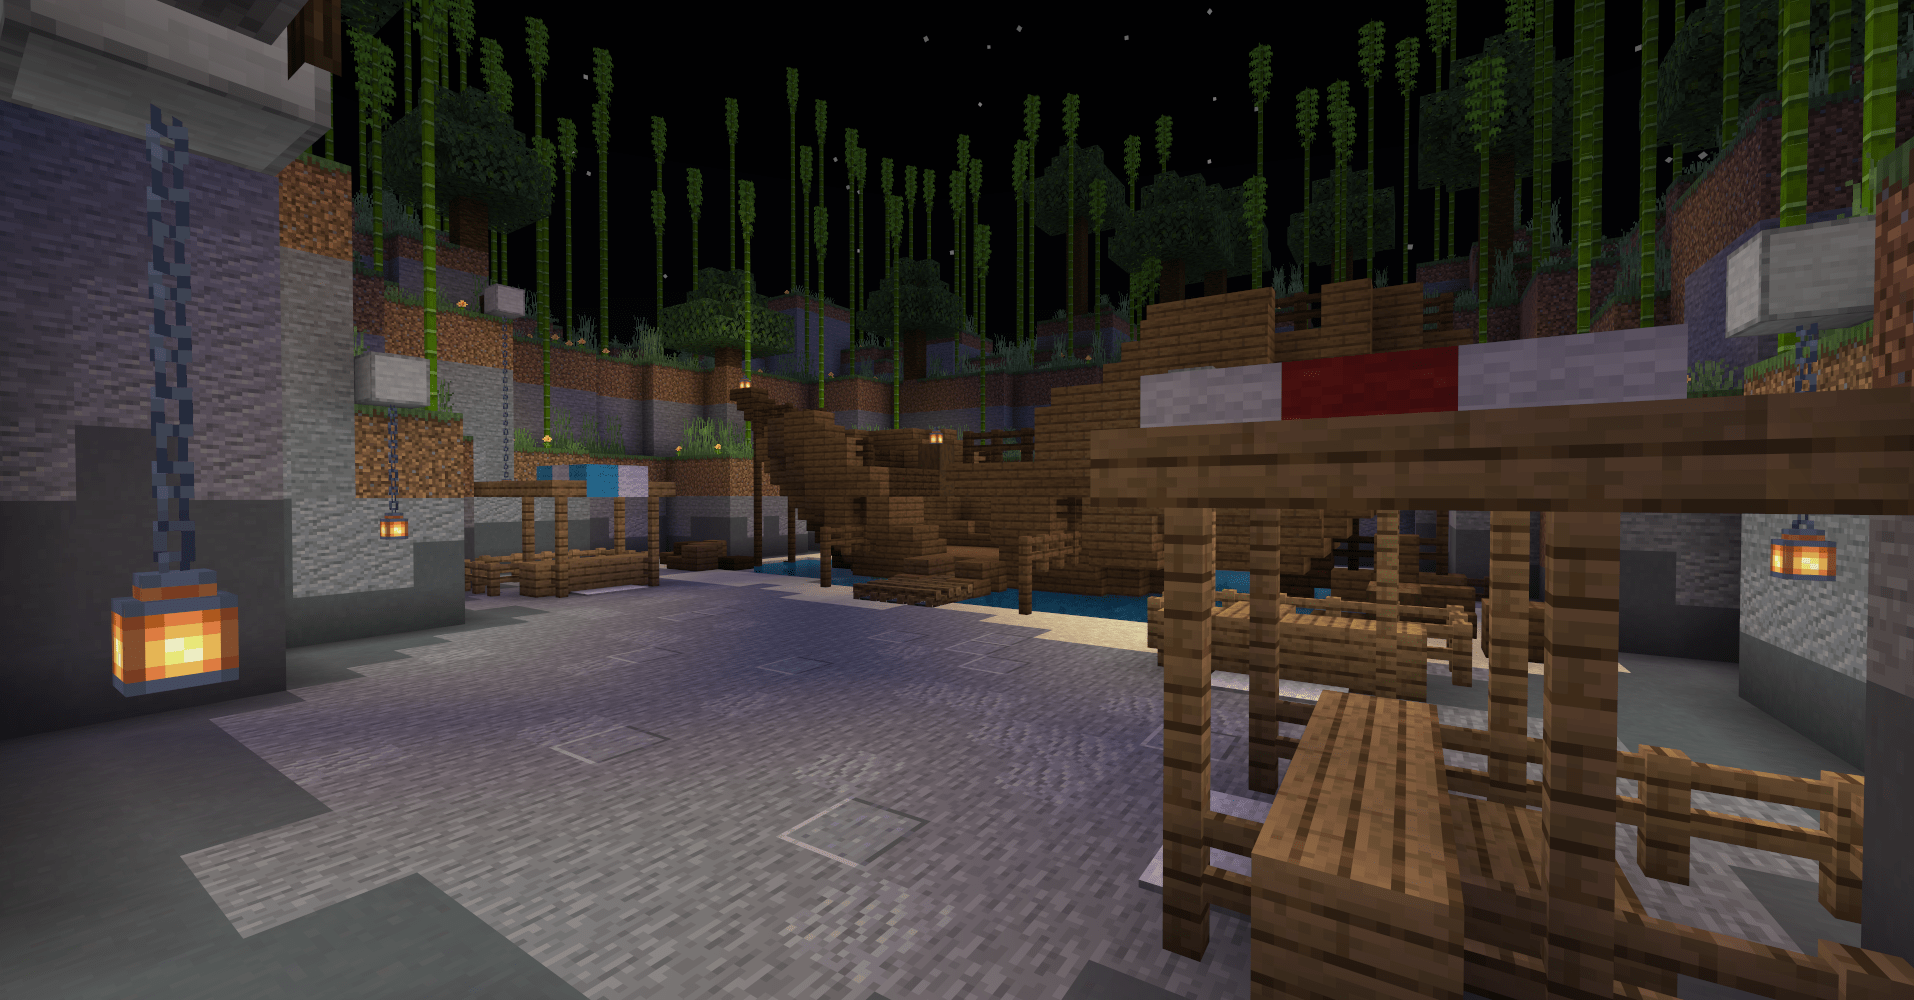
在大厅内添加多个小动物形态的NPC:熊猫、鹦鹉、狼。
> 有游戏背景或世界观的玩法地图,将所有的游戏元素风格统一化也是很重要的;

## 制作UI添加引导手册
引导手册可以有很多方式体现,最简单的方法就是将引导文字写在【书与笔】上并放在游戏比较“显眼”的位置即可。不过这次我们放置了NPC,所以需要制作UI,在玩家与NPC交互的时候,显示UI。
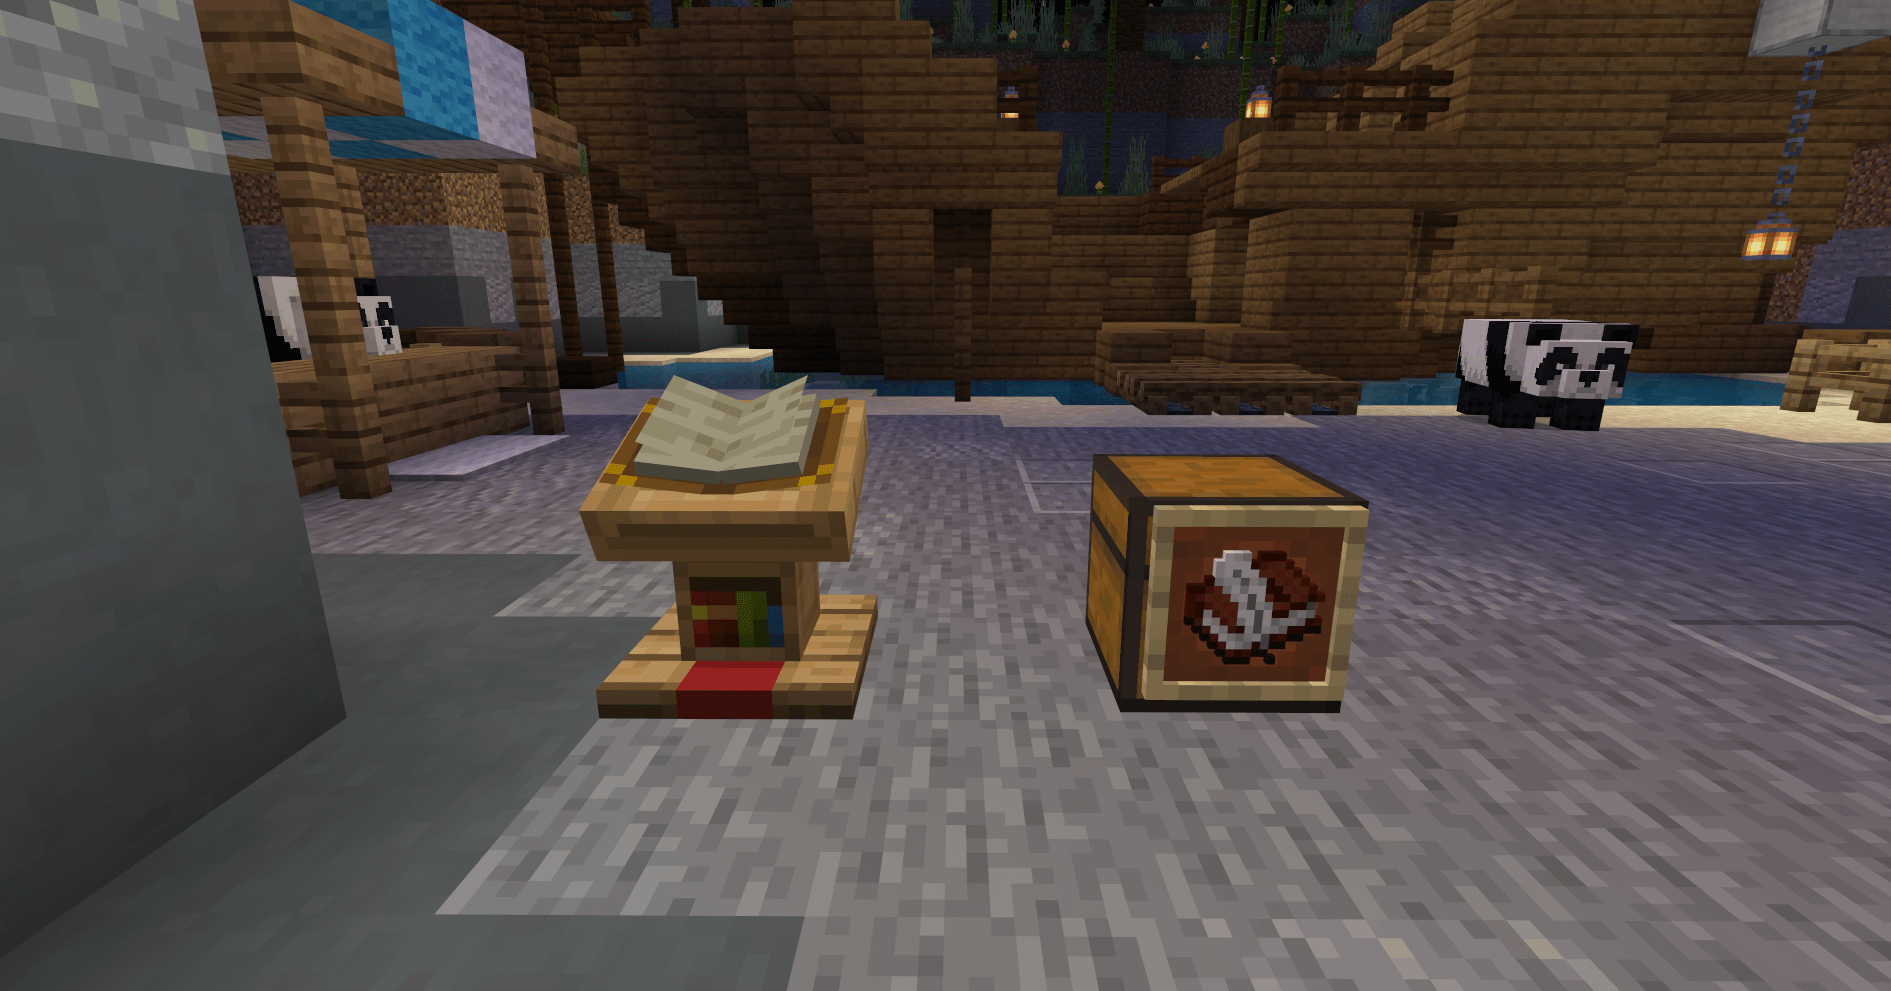
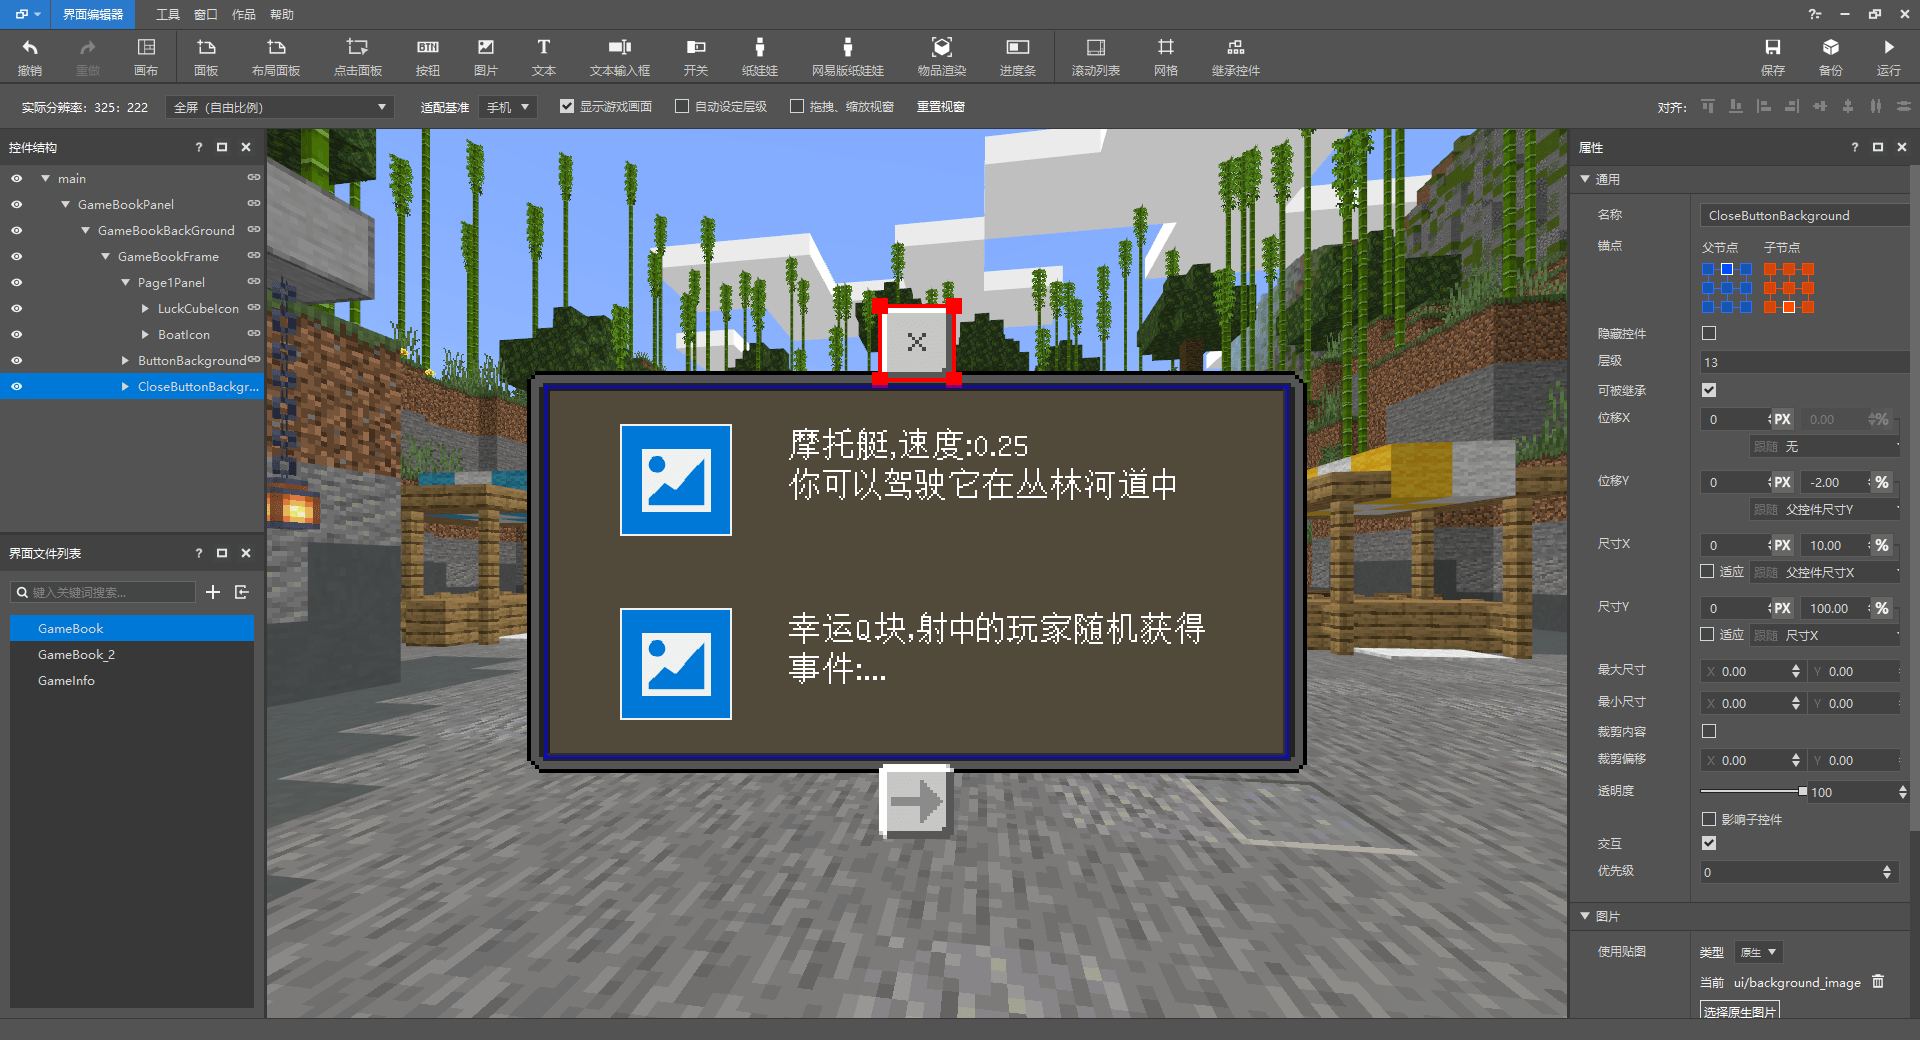
打开我的世界开发工作台的界面编辑器,制作引导手册界面和欢迎界面;
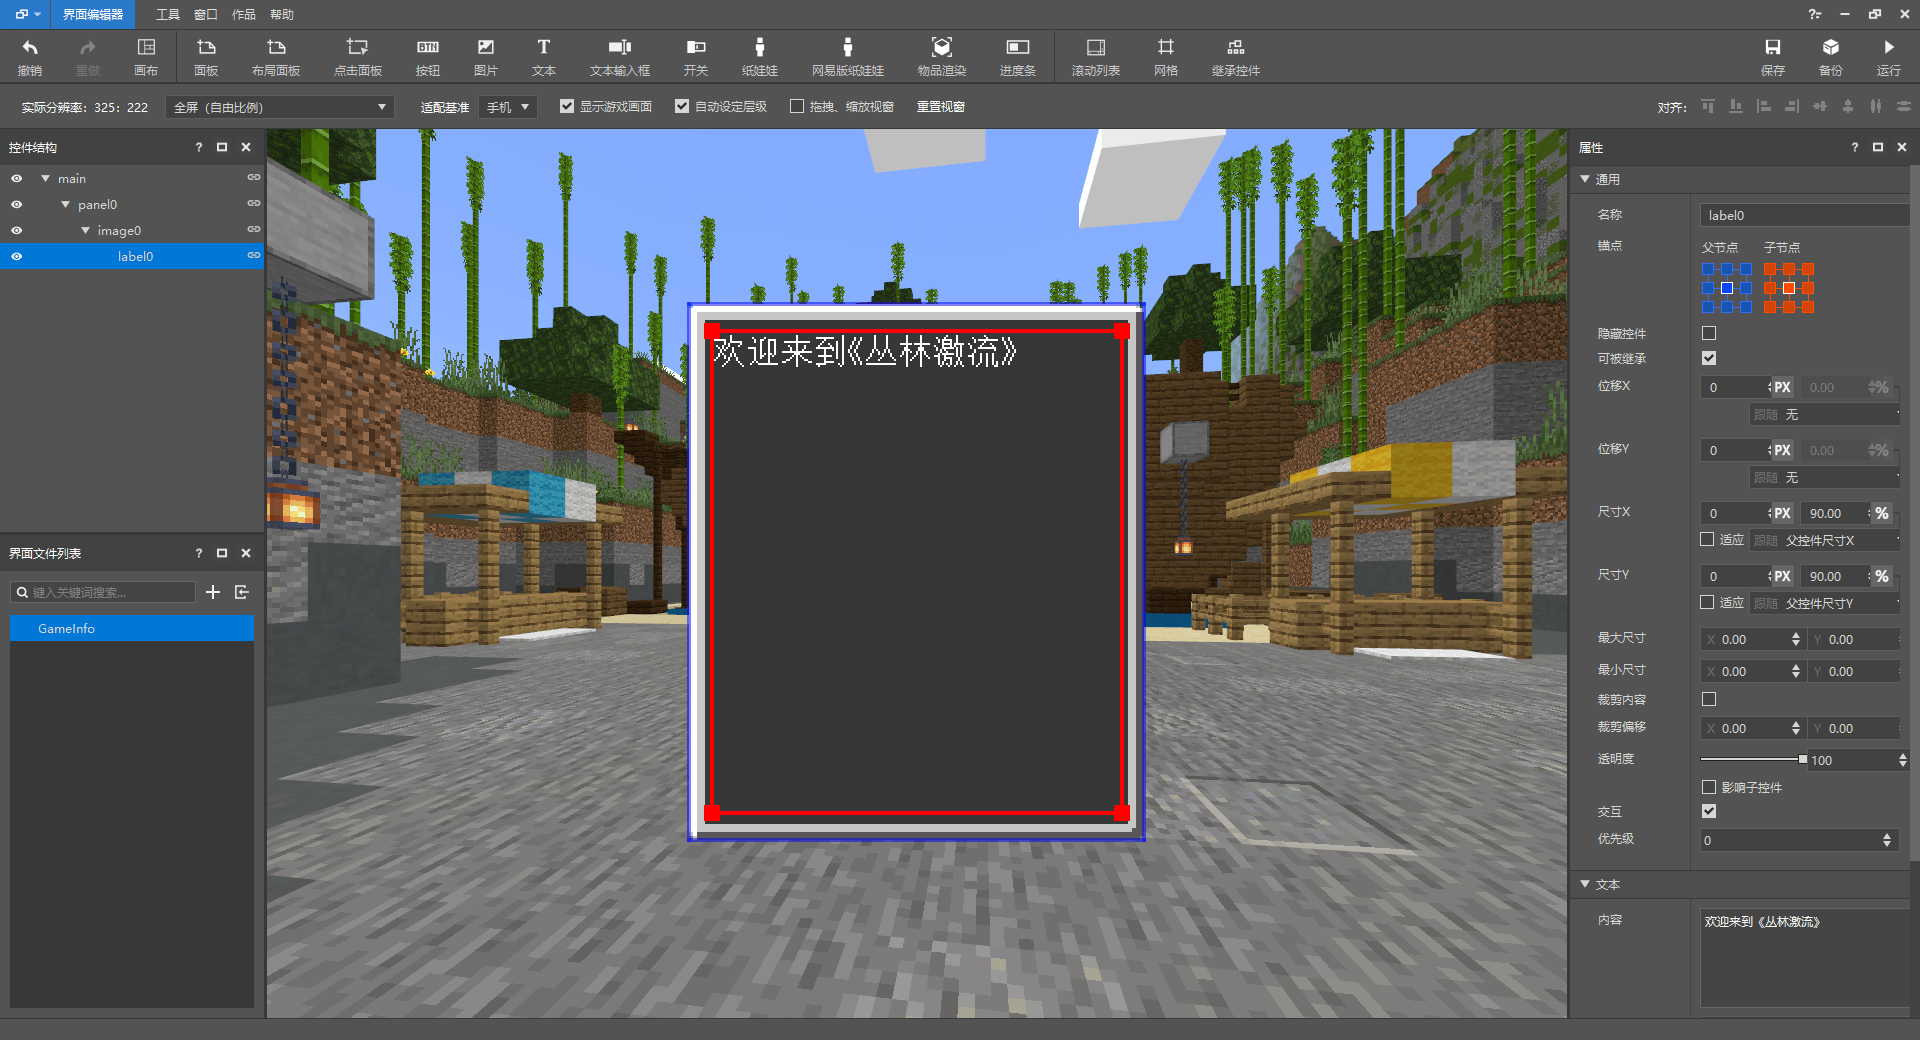
欢迎界面主要填充一些对于地图的基本介绍和简单引导;当然,实际需要什么内容,还是根据引导设计和开发者习惯来决定。
引导手册则需要多页,将玩法内容罗列在此供玩家翻阅、学习。大部分情况下,小游戏地图不怎么需要引导手册,因为无论是场景还是玩法都是有局限性的,玩家在游玩的过程中必定会发现和体验到,全部的内容被玩家了解后,在真正游玩的时候可能会丧失一定的新鲜感。

**制作好UI后,我们需要将UI与NPC“连接”起来:**
创建UI的脚本文件FlumeRideInfoUI.py,并继承ScreenNode类
```python
# -*- coding: utf-8 -*-
import mod.client.extraClientApi as clientApi
ViewBinder = clientApi.GetViewBinderCls()
ViewRequest = clientApi.GetViewViewRequestCls()
ScreenNode = clientApi.GetScreenNodeCls()
class FlumeRideInfoUI(ScreenNode):
def __init__(self, namespace, name, param):
ScreenNode.__init__(self, namespace, name, param)
```
创建FlumeRideServerSystem.py、FlumeRideClientSystem.py
```python
# -*- coding: utf-8 -*-
import mod.server.extraServerApi as serverApi
ServerSystem = serverApi.GetServerSystemCls()
class FlumeRideServerSystem(ServerSystem):
def __init__(self, namespace, systemName):
ServerSystem.__init__(self, namespace, systemName)
# 提前将放在大厅的NPC生物ID获取到并保存在这里,用于判断玩家交互的NPC
self.npcIdList = {"panda": "-85899345885", "panda2": "-158913789845", "parrot": "-158913789915", "wolf": "-158913789911"}
nameSpace, systemName = serverApi.GetEngineNamespace(), serverApi.GetEngineSystemName()
# 监听PlayerAttackEntityEvent事件
self.ListenForEvent(nameSpace, systemName, "PlayerAttackEntityEvent", self, self.PlayerAttackEntityEvent)
# 玩家攻击生物时触发
def PlayerAttackEntityEvent(self, args):
# 由事件获取到的玩家攻击的生物ID
playerId = args['playerId']
entityId = args['victimId']
# 判断不同的NPC生物
if entityId == self.npcIdList["panda"]:
# 发送事件到客户端,打开UI,传输字典参数UIType用来判断玩家交互的生物以打开不同UI
self.NotifyToClient(playerId, "OpenGameInfoUI", {"UIType": "panda"})
elif entityId == self.npcIdList["panda2"]:
pass
elif entityId == self.npcIdList["parrot"]:
pass
elif entityId == self.npcIdList["wolf"]:
self.NotifyToClient(playerId, "OpenGameInfoUI", {"UIType": "wolf"})
```
在服务端脚本添加玩家攻击生物的事件并判断,如果是大厅的NPC,就传输事件到客户端创建UI。
```python
# -*- coding: utf-8 -*-
import mod.client.extraClientApi as clientApi
ClientSystem = clientApi.GetClientSystemCls()
class FlumeRideClientSystem(ClientSystem):
def __init__(self, namespace, systemName):
ClientSystem.__init__(self, namespace, systemName)
print "Client初始化"
nameSpace, systemName = clientApi.GetEngineNamespace(), clientApi.GetEngineSystemName()
# 监听UiInitFinished事件
self.ListenForEvent(nameSpace, systemName, "UiInitFinished", self, self.UiInitFinished)
# 监听由FlumeRideServerSystem传过来的OpenGameInfoUI事件
self.ListenForEvent("FlumeRide", "FlumeRideServerSystem", "OpenGameInfoUI", self, self.OpenUI)
# 由FlumeRideServerSystem传过来的OpenGameInfoUI事件
# 当玩家与NPC交互时,判断交互的NPC类型并打开对应的UI
def OpenUI(self, args):
UIType = args['UIType']
if UIType == "panda":
clientApi.PushScreen("FlumeRide", "FlumeRideGameInfo")
elif UIType == "wolf":
clientApi.PushScreen("FlumeRide", "FlumeRideGameBook_1")
# UI初始化完成,将UI注册
def UiInitFinished(self, args):
clientApi.RegisterUI("FlumeRide", "FlumeRideGameInfo", "Script_FlumeRide.uiScript.FlumeRideInfoUI.FlumeRideInfoUI", "GameInfo.main")
clientApi.RegisterUI("FlumeRide", "FlumeRideGameBook_1", "Script_FlumeRide.uiScript.FlumeRideInfoUI.FlumeRideInfoUI", "GameBook.main")
clientApi.RegisterUI("FlumeRide", "FlumeRideGameBook_2", "Script_FlumeRide.uiScript.FlumeRideInfoUI.FlumeRideInfoUI", "GameBook_2.main")
```
现在,我们攻击大厅的生物,就可以打开UI界面了。
 简单修改UI文件,将关闭按钮和引导手册的翻页按钮与FlumeRideInfoUI.py脚本文件中的某个函数绑定。
```json
// ...
// UI文件
// 关闭按钮控件
"GameInfoButton@common.button" : {
// ···
// 绑定按钮按下时触发的函数 %ScreenNode脚本.函数名
"$pressed_button_name" : "%FlumeRideInfoUI.ClickedCloseButton",
// 需要删除
"button_mappings" : [],
// ...
},
// 翻页按钮同理
```
```python
# -*- coding: utf-8 -*-
# ...
class FlumeRideInfoUI(ScreenNode):
def __init__(self, namespace, name, param):
ScreenNode.__init__(self, namespace, name, param)
# 绑定关闭按钮
@ViewBinder.binding(ViewBinder.BF_ButtonClickUp)
def ClickedCloseButton(self, args):
clientApi.PopScreen()
# 绑定翻页按钮
@ViewBinder.binding(ViewBinder.BF_ButtonClickUp)
def ClickedPageTurnButton(self, args):
GameBook1UI = clientApi.GetUI("FlumeRide", "FlumeRideGameBook_1")
GameBook2UI = clientApi.GetUI("FlumeRide", "FlumeRideGameBook_2")
if GameBook1UI:
clientApi.PopScreen()
clientApi.PushScreen("FlumeRide", "FlumeRideGameBook_2")
elif GameBook2UI:
clientApi.PopScreen()
clientApi.PushScreen("FlumeRide", "FlumeRideGameBook_1")
```
简单修改UI文件,将关闭按钮和引导手册的翻页按钮与FlumeRideInfoUI.py脚本文件中的某个函数绑定。
```json
// ...
// UI文件
// 关闭按钮控件
"GameInfoButton@common.button" : {
// ···
// 绑定按钮按下时触发的函数 %ScreenNode脚本.函数名
"$pressed_button_name" : "%FlumeRideInfoUI.ClickedCloseButton",
// 需要删除
"button_mappings" : [],
// ...
},
// 翻页按钮同理
```
```python
# -*- coding: utf-8 -*-
# ...
class FlumeRideInfoUI(ScreenNode):
def __init__(self, namespace, name, param):
ScreenNode.__init__(self, namespace, name, param)
# 绑定关闭按钮
@ViewBinder.binding(ViewBinder.BF_ButtonClickUp)
def ClickedCloseButton(self, args):
clientApi.PopScreen()
# 绑定翻页按钮
@ViewBinder.binding(ViewBinder.BF_ButtonClickUp)
def ClickedPageTurnButton(self, args):
GameBook1UI = clientApi.GetUI("FlumeRide", "FlumeRideGameBook_1")
GameBook2UI = clientApi.GetUI("FlumeRide", "FlumeRideGameBook_2")
if GameBook1UI:
clientApi.PopScreen()
clientApi.PushScreen("FlumeRide", "FlumeRideGameBook_2")
elif GameBook2UI:
clientApi.PopScreen()
clientApi.PushScreen("FlumeRide", "FlumeRideGameBook_1")
```
 ## 添加NPC对话
接下来为另一位NPC添加对话,简单描述一下地图背景和引导即可。
```python
# -*- coding: utf-8 -*-
import mod.server.extraServerApi as serverApi
ServerSystem = serverApi.GetServerSystemCls()
commandComp = serverApi.GetEngineCompFactory().CreateCommand(serverApi.GetLevelId())
class FlumeRideServerSystem(ServerSystem):
def __init__(self, namespace, systemName):
ServerSystem.__init__(self, namespace, systemName)
# ...
# 监听PlayerAttackEntityEvent事件
self.ListenForEvent(nameSpace, systemName, "PlayerAttackEntityEvent", self, self.PlayerAttackEntityEvent)
# 监听ClientLoadAddonsFinishServerEvent事件
self.ListenForEvent(nameSpace, systemName, "ClientLoadAddonsFinishServerEvent", self, self.DataInit)
# 玩家客户端加载完毕时触发,创建玩家数据
def DataInit(self, args):
# 由事件获取的玩家ID
playerId = args['playerId']
# 获取玩家的数据
playerDataComp = serverApi.GetEngineCompFactory().CreateExtraData(playerId)
pandaMsgData = playerDataComp.GetExtraData("pandaMsg")
# 如果这个玩家没有数据,就设置一个
if not pandaMsgData:
playerDataComp.SetExtraData("pandaMsg", 0) # 用来判断玩家的对话阶段
# 玩家攻击生物时触发
def PlayerAttackEntityEvent(self, args):
def Panda2Guide():
# 获取玩家的名称
playerNameComp = serverApi.GetEngineCompFactory().CreateName(playerId)
playerName = playerNameComp.GetName()
# 获取玩家的pandaMsg数据
playerDataComp = serverApi.GetEngineCompFactory().CreateExtraData(playerId)
pandaMsg = playerDataComp.GetExtraData("pandaMsg")
commandComp.SetCommand("playsound random.orb " + playerName + " ~ ~ ~ 3 1 1")
# 根据玩家当前的对话阶段,触发不同的对话分支
if pandaMsg == 0:
# 使用指令接口生成对话
commandComp.SetCommand('tellraw ' + playerName + ' {"rawtext":[{"text":"熊猫 §a§l| §r§f《丛林激流》欢迎你! §a(1/6)"}]}')
elif pandaMsg == 1:
commandComp.SetCommand('tellraw ' + playerName + ' {"rawtext":[{"text":"熊猫 §a§l| §r§f丛林的小动物们和人类一起建造了这里! §a(2/6)"}]}')
elif pandaMsg == 2:
commandComp.SetCommand('tellraw ' + playerName + ' {"rawtext":[{"text":"熊猫 §a§l| §r§f今天是激流游乐园开业的第一天; §a(3/6)"}]}')
elif pandaMsg == 3:
commandComp.SetCommand('tellraw ' + playerName + ' {"rawtext":[{"text":"熊猫 §a§l| §r§f鹦鹉小姐会教你如何在水赛道上更加灵活 §a(4/6)"}]}')
elif pandaMsg == 4:
commandComp.SetCommand('tellraw ' + playerName + ' {"rawtext":[{"text":"熊猫 §a§l| §r§f关于丛林激流的一切还可以问问狼先生,他什么都知道 §a(5/6)"}]}')
elif pandaMsg == 5:
commandComp.SetCommand('tellraw ' + playerName + ' {"rawtext":[{"text":"熊猫 §a§l| §r§f当然,不要忘了叫上小伙伴一起享受这快乐的游戏时光! §a(6/6)"}]}')
# 到最后一条对话就重置数据并且return
playerDataComp.SetExtraData("pandaMsg", 0)
return
# 更新当前数据+1
pandaMsg += 1
playerDataComp.SetExtraData("pandaMsg", pandaMsg)
playerId = args['playerId']
entityId = args['victimId']
if entityId == self.npcIdList["panda"]:
# ...
elif entityId == self.npcIdList["panda2"]:
Panda2Guide()
elif entityId == self.npcIdList["parrot"]:
# ...
elif entityId == self.npcIdList["wolf"]:
# ...
```
## 添加NPC对话
接下来为另一位NPC添加对话,简单描述一下地图背景和引导即可。
```python
# -*- coding: utf-8 -*-
import mod.server.extraServerApi as serverApi
ServerSystem = serverApi.GetServerSystemCls()
commandComp = serverApi.GetEngineCompFactory().CreateCommand(serverApi.GetLevelId())
class FlumeRideServerSystem(ServerSystem):
def __init__(self, namespace, systemName):
ServerSystem.__init__(self, namespace, systemName)
# ...
# 监听PlayerAttackEntityEvent事件
self.ListenForEvent(nameSpace, systemName, "PlayerAttackEntityEvent", self, self.PlayerAttackEntityEvent)
# 监听ClientLoadAddonsFinishServerEvent事件
self.ListenForEvent(nameSpace, systemName, "ClientLoadAddonsFinishServerEvent", self, self.DataInit)
# 玩家客户端加载完毕时触发,创建玩家数据
def DataInit(self, args):
# 由事件获取的玩家ID
playerId = args['playerId']
# 获取玩家的数据
playerDataComp = serverApi.GetEngineCompFactory().CreateExtraData(playerId)
pandaMsgData = playerDataComp.GetExtraData("pandaMsg")
# 如果这个玩家没有数据,就设置一个
if not pandaMsgData:
playerDataComp.SetExtraData("pandaMsg", 0) # 用来判断玩家的对话阶段
# 玩家攻击生物时触发
def PlayerAttackEntityEvent(self, args):
def Panda2Guide():
# 获取玩家的名称
playerNameComp = serverApi.GetEngineCompFactory().CreateName(playerId)
playerName = playerNameComp.GetName()
# 获取玩家的pandaMsg数据
playerDataComp = serverApi.GetEngineCompFactory().CreateExtraData(playerId)
pandaMsg = playerDataComp.GetExtraData("pandaMsg")
commandComp.SetCommand("playsound random.orb " + playerName + " ~ ~ ~ 3 1 1")
# 根据玩家当前的对话阶段,触发不同的对话分支
if pandaMsg == 0:
# 使用指令接口生成对话
commandComp.SetCommand('tellraw ' + playerName + ' {"rawtext":[{"text":"熊猫 §a§l| §r§f《丛林激流》欢迎你! §a(1/6)"}]}')
elif pandaMsg == 1:
commandComp.SetCommand('tellraw ' + playerName + ' {"rawtext":[{"text":"熊猫 §a§l| §r§f丛林的小动物们和人类一起建造了这里! §a(2/6)"}]}')
elif pandaMsg == 2:
commandComp.SetCommand('tellraw ' + playerName + ' {"rawtext":[{"text":"熊猫 §a§l| §r§f今天是激流游乐园开业的第一天; §a(3/6)"}]}')
elif pandaMsg == 3:
commandComp.SetCommand('tellraw ' + playerName + ' {"rawtext":[{"text":"熊猫 §a§l| §r§f鹦鹉小姐会教你如何在水赛道上更加灵活 §a(4/6)"}]}')
elif pandaMsg == 4:
commandComp.SetCommand('tellraw ' + playerName + ' {"rawtext":[{"text":"熊猫 §a§l| §r§f关于丛林激流的一切还可以问问狼先生,他什么都知道 §a(5/6)"}]}')
elif pandaMsg == 5:
commandComp.SetCommand('tellraw ' + playerName + ' {"rawtext":[{"text":"熊猫 §a§l| §r§f当然,不要忘了叫上小伙伴一起享受这快乐的游戏时光! §a(6/6)"}]}')
# 到最后一条对话就重置数据并且return
playerDataComp.SetExtraData("pandaMsg", 0)
return
# 更新当前数据+1
pandaMsg += 1
playerDataComp.SetExtraData("pandaMsg", pandaMsg)
playerId = args['playerId']
entityId = args['victimId']
if entityId == self.npcIdList["panda"]:
# ...
elif entityId == self.npcIdList["panda2"]:
Panda2Guide()
elif entityId == self.npcIdList["parrot"]:
# ...
elif entityId == self.npcIdList["wolf"]:
# ...
```
 使用【指令】实现这种对话效果,表现力较为薄弱,如果用UI代替会更好;但是实现起来会非常简单,如果对UI不熟练,可以使用这种方法。
## 控制镜头介绍内容
还剩最后一位NPC:鹦鹉;它将带领玩家观赏和讲解游戏中的场景和内容。
使用【指令】实现这种对话效果,表现力较为薄弱,如果用UI代替会更好;但是实现起来会非常简单,如果对UI不熟练,可以使用这种方法。
## 控制镜头介绍内容
还剩最后一位NPC:鹦鹉;它将带领玩家观赏和讲解游戏中的场景和内容。
 ```python
# -*- coding: utf-8 -*-
import mod.server.extraServerApi as serverApi
ServerSystem = serverApi.GetServerSystemCls()
timerComp = serverApi.GetEngineCompFactory().CreateGame(serverApi.GetLevelId())
commandComp = serverApi.GetEngineCompFactory().CreateCommand(serverApi.GetLevelId())
class FlumeRideServerSystem(ServerSystem):
def __init__(self, namespace, systemName):
ServerSystem.__init__(self, namespace, systemName)
# ...
def DataInit(self, args):
# ...
if not pandaMsgData:
playerDataComp.SetExtraData("pandaMsg", 0)
# 添加新的数据用于判断鹦鹉讲解的阶段
playerDataComp.SetExtraData("parrotMsg", 0)
def PlayerAttackEntityEvent(self, args):
def ParrotGuide():
# 获取玩家的名称
playerNameComp = serverApi.GetEngineCompFactory().CreateName(playerId)
playerName = playerNameComp.GetName()
# 获取玩家的parrotMsg数据
playerDataComp = serverApi.GetEngineCompFactory().CreateExtraData(playerId)
parrotMsg = playerDataComp.GetExtraData("parrotMsg")
# 根据玩家当前的讲解阶段,触发不同的讲解分支
if parrotMsg == 0:
# 传送玩家
commandComp.SetCommand("tp " + playerName + " 29.5 80 -242.5 -20.4 31.4")
# 发送事件到客户端用于锁定玩家的控制
self.NotifyToClient(playerId, "PlayerCamera", {"Camera": "Lock"})
# 使用指令接口生成对话
commandComp.SetCommand('tellraw ' + playerName + ' {"rawtext":[{"text":"鹦鹉 §e§l| §r§f这是摩托艇,你需要驾驶它驰骋在丛林河道上 §a(1/3)"}]}')
elif parrotMsg == 1:
commandComp.SetCommand("tp " + playerName + " 23.6 79 -252.5 54.1 16.4")
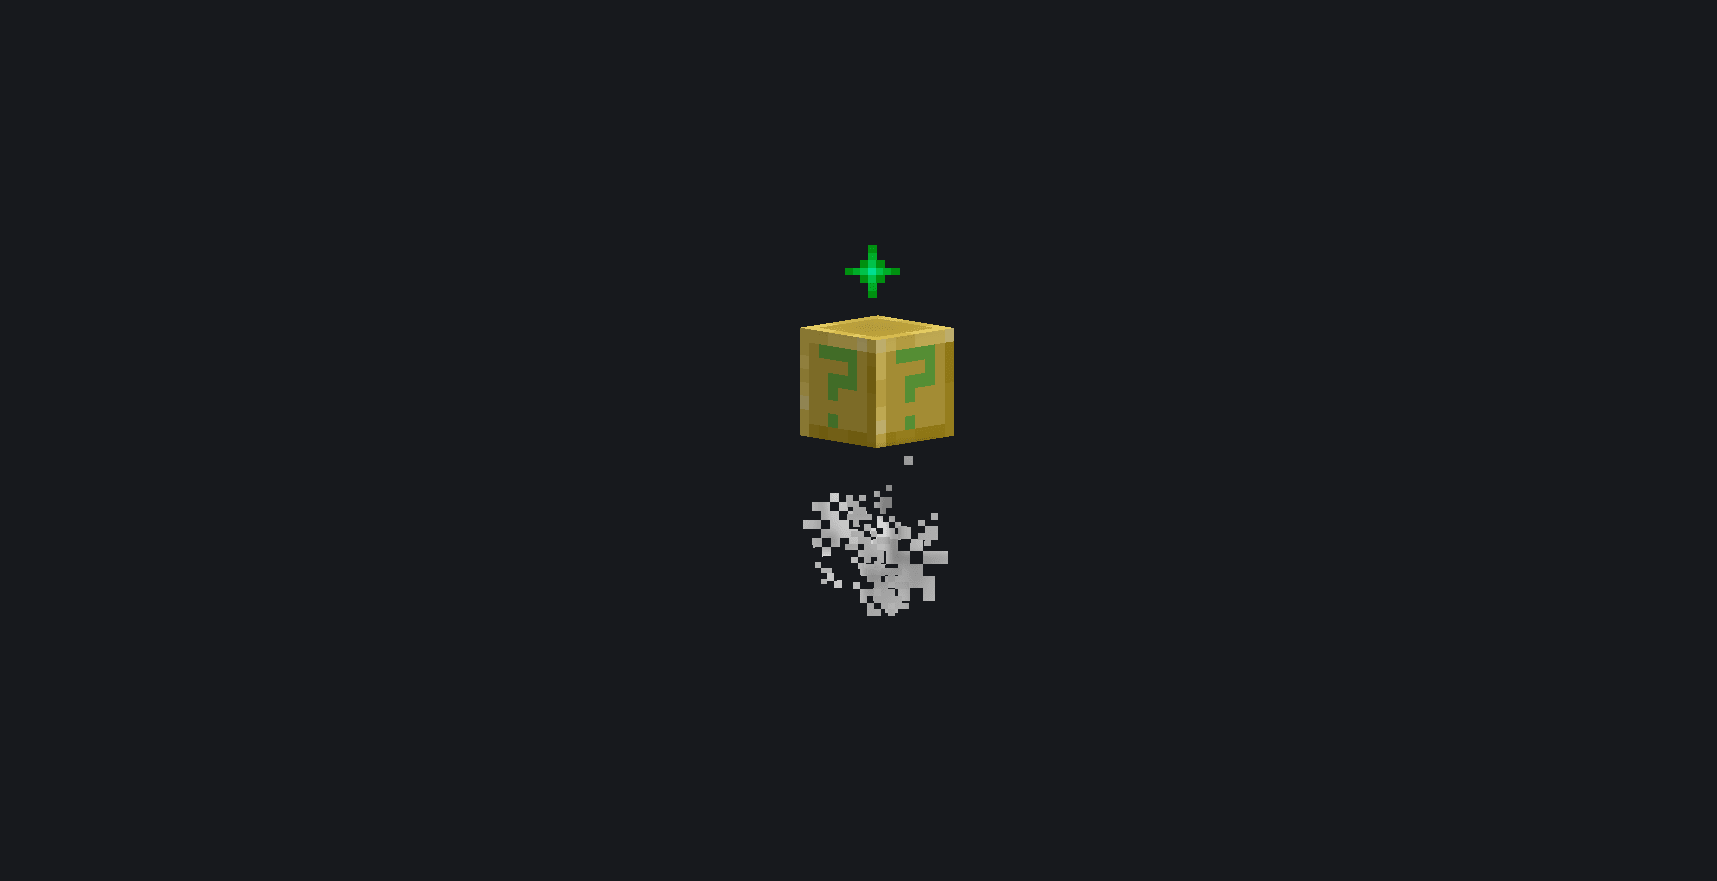
commandComp.SetCommand('tellraw ' + playerName + ' {"rawtext":[{"text":"鹦鹉 §e§l| §r§f在丛林中,你会看到幸运Q块,用弩射击它将会发生随机的事件 §a(2/3)"}]}')
elif parrotMsg == 2:
commandComp.SetCommand("tp " + playerName + " 33.4 112 -136.4 -162.6 -7.8")
commandComp.SetCommand('tellraw ' + playerName + ' {"rawtext":[{"text":"鹦鹉 §e§l| §r§f熟练操控摩托艇,精准射击幸运Q块,在丛林中激流吧! §a(3/3)"}]}')
elif parrotMsg == 3:
commandComp.SetCommand("tp " + playerName + " 22 68 -254 -114.8 0.9")
# 讲解结束后,解锁玩家的控制
self.NotifyToClient(playerId, "PlayerCamera", {"Camera": "UnLock"})
# 重置阶段数据并return
playerDataComp.SetExtraData("parrotMsg", 0)
return
commandComp.SetCommand("playsound random.orb " + playerName + " ~ ~ ~ 3 1 1")
# 更新当前数据+1
parrotMsg += 1
playerDataComp.SetExtraData("parrotMsg", parrotMsg)
playerId = args['playerId']
entityId = args['victimId']
if entityId == self.npcIdList["panda"]:
# ...
elif entityId == self.npcIdList["panda2"]:
# ...
elif entityId == self.npcIdList["parrot"]:
# 触发四次ParrotGuide,利用定时器接口,实现延迟触发
ParrotGuide()
timerComp.AddTimer(10, ParrotGuide)
timerComp.AddTimer(20, ParrotGuide)
timerComp.AddTimer(30, ParrotGuide)
elif entityId == self.npcIdList["wolf"]:
# ...
```
```python
# -*- coding: utf-8 -*-
import mod.client.extraClientApi as clientApi
ClientSystem = clientApi.GetClientSystemCls()
class FlumeRideClientSystem(ClientSystem):
def __init__(self, namespace, systemName):
ClientSystem.__init__(self, namespace, systemName)
# 监听由FlumeRideServerSystem传过来的PlayerCamera事件
self.ListenForEvent("FlumeRide", "FlumeRideServerSystem", "PlayerCamera", self, self.PlayerCamera)
# 用于锁定和解锁玩家控制
def PlayerCamera(self, args):
# 获取玩家控制接口
controlComp = clientApi.GetEngineCompFactory().CreateOperation(clientApi.GetLevelId())
if args["Camera"] == "Lock":
controlComp.SetCanAll(False)
elif args["Camera"] == "UnLock":
controlComp.SetCanAll(True)
```
这种形式非常直观、生动;镜头可以是静态的,也可以制作成动态;镜头内的方块、生物等内容也可以通过动画加强表现力。非常适合用来设计引导!
## 其它
在一些可交互或者有玩法内容的实体、方块上添加标识,会更加直观:
```python
# -*- coding: utf-8 -*-
import mod.server.extraServerApi as serverApi
ServerSystem = serverApi.GetServerSystemCls()
timerComp = serverApi.GetEngineCompFactory().CreateGame(serverApi.GetLevelId())
commandComp = serverApi.GetEngineCompFactory().CreateCommand(serverApi.GetLevelId())
class FlumeRideServerSystem(ServerSystem):
def __init__(self, namespace, systemName):
ServerSystem.__init__(self, namespace, systemName)
# ...
def DataInit(self, args):
# ...
if not pandaMsgData:
playerDataComp.SetExtraData("pandaMsg", 0)
# 添加新的数据用于判断鹦鹉讲解的阶段
playerDataComp.SetExtraData("parrotMsg", 0)
def PlayerAttackEntityEvent(self, args):
def ParrotGuide():
# 获取玩家的名称
playerNameComp = serverApi.GetEngineCompFactory().CreateName(playerId)
playerName = playerNameComp.GetName()
# 获取玩家的parrotMsg数据
playerDataComp = serverApi.GetEngineCompFactory().CreateExtraData(playerId)
parrotMsg = playerDataComp.GetExtraData("parrotMsg")
# 根据玩家当前的讲解阶段,触发不同的讲解分支
if parrotMsg == 0:
# 传送玩家
commandComp.SetCommand("tp " + playerName + " 29.5 80 -242.5 -20.4 31.4")
# 发送事件到客户端用于锁定玩家的控制
self.NotifyToClient(playerId, "PlayerCamera", {"Camera": "Lock"})
# 使用指令接口生成对话
commandComp.SetCommand('tellraw ' + playerName + ' {"rawtext":[{"text":"鹦鹉 §e§l| §r§f这是摩托艇,你需要驾驶它驰骋在丛林河道上 §a(1/3)"}]}')
elif parrotMsg == 1:
commandComp.SetCommand("tp " + playerName + " 23.6 79 -252.5 54.1 16.4")
commandComp.SetCommand('tellraw ' + playerName + ' {"rawtext":[{"text":"鹦鹉 §e§l| §r§f在丛林中,你会看到幸运Q块,用弩射击它将会发生随机的事件 §a(2/3)"}]}')
elif parrotMsg == 2:
commandComp.SetCommand("tp " + playerName + " 33.4 112 -136.4 -162.6 -7.8")
commandComp.SetCommand('tellraw ' + playerName + ' {"rawtext":[{"text":"鹦鹉 §e§l| §r§f熟练操控摩托艇,精准射击幸运Q块,在丛林中激流吧! §a(3/3)"}]}')
elif parrotMsg == 3:
commandComp.SetCommand("tp " + playerName + " 22 68 -254 -114.8 0.9")
# 讲解结束后,解锁玩家的控制
self.NotifyToClient(playerId, "PlayerCamera", {"Camera": "UnLock"})
# 重置阶段数据并return
playerDataComp.SetExtraData("parrotMsg", 0)
return
commandComp.SetCommand("playsound random.orb " + playerName + " ~ ~ ~ 3 1 1")
# 更新当前数据+1
parrotMsg += 1
playerDataComp.SetExtraData("parrotMsg", parrotMsg)
playerId = args['playerId']
entityId = args['victimId']
if entityId == self.npcIdList["panda"]:
# ...
elif entityId == self.npcIdList["panda2"]:
# ...
elif entityId == self.npcIdList["parrot"]:
# 触发四次ParrotGuide,利用定时器接口,实现延迟触发
ParrotGuide()
timerComp.AddTimer(10, ParrotGuide)
timerComp.AddTimer(20, ParrotGuide)
timerComp.AddTimer(30, ParrotGuide)
elif entityId == self.npcIdList["wolf"]:
# ...
```
```python
# -*- coding: utf-8 -*-
import mod.client.extraClientApi as clientApi
ClientSystem = clientApi.GetClientSystemCls()
class FlumeRideClientSystem(ClientSystem):
def __init__(self, namespace, systemName):
ClientSystem.__init__(self, namespace, systemName)
# 监听由FlumeRideServerSystem传过来的PlayerCamera事件
self.ListenForEvent("FlumeRide", "FlumeRideServerSystem", "PlayerCamera", self, self.PlayerCamera)
# 用于锁定和解锁玩家控制
def PlayerCamera(self, args):
# 获取玩家控制接口
controlComp = clientApi.GetEngineCompFactory().CreateOperation(clientApi.GetLevelId())
if args["Camera"] == "Lock":
controlComp.SetCanAll(False)
elif args["Camera"] == "UnLock":
controlComp.SetCanAll(True)
```
这种形式非常直观、生动;镜头可以是静态的,也可以制作成动态;镜头内的方块、生物等内容也可以通过动画加强表现力。非常适合用来设计引导!
## 其它
在一些可交互或者有玩法内容的实体、方块上添加标识,会更加直观:
